I’ve seen a middle blocker’s pinky go 90 degrees in the wrong direction because she didn’t brace the joint before a heavy block. That image stayed with me through college, through every warm-up, through every tournament. We don’t tape for “prevention” in some abstract sense—we tape for structural survival. When you’re absorbing 70+ mph spikes with your fingertips, those thin strips of white tape are the difference between playing through a five-set match and watching from the bench with an ice pack.
In my college days as an outside hitter, taping became as automatic as putting on my knee pads. But here’s what most guides won’t tell you: how you tape depends entirely on what you do on the court. A middle blocker bracing against impact tapes completely differently than a setter protecting their touch. Get this wrong, and you’re either cutting off circulation or leaving joints exposed to exactly the kind of trauma you’re trying to prevent.
Quick Reference: Position-Specific Taping Patterns
| Position | Primary Concern | Joint Target | Taping Style |
|---|---|---|---|
| Middle Blocker | Blocking impact | PIP (middle knuckle) | “X-Wrap” for structural support |
| Setter | Grip & friction | DIP (fingertip) | “Butterfly” wrap to prevent skin splits |
| Outside Hitter | Jammed finger | PIP + DIP | Buddy system with zinc oxide tape |
| Libero | Defensive digs | Fingertip padding | Minimalist skin protection |

The Joints That Take the Punishment
Know Your Joints
Every finger has three joints. The PIP joint (middle knuckle) absorbs blocking impact—most dislocations happen here. The DIP joint (fingertip) is where setters get “mallet finger” injuries. Tape the wrong joint, and you’re protecting nothing.
The PIP Joint (Proximal Interphalangeal) is your middle knuckle—the one that bends when you make a fist. For blockers, this is ground zero. When a 75 mph spike hits your extended hand, the PIP joint absorbs the bulk of the lateral force. Research shows approximately 24% of all finger injuries in adult volleyball involve dislocations, with the PIP joint taking the worst of it.
The DIP Joint (Distal Interphalangeal) is your fingertip knuckle—the one closest to your nail. Setters worry about this joint because it’s vulnerable to “mallet finger” injuries, where the ball strikes the extended fingertip and ruptures the extensor tendon. When you see a player’s fingertip drooping unnaturally, that’s a DIP joint injury from a bad set contact.
The MCP Joint (Metacarpophalangeal) is your main knuckle where your finger meets your hand. More stable, but still vulnerable during awkward ball contacts on defensive plays.
The Six Reasons Players Tape Their Fingers
1. Impact Stabilization: The Blocker’s Reality
Atomic Fact: The Force Numbers
Peak blocking forces can exceed 500-1,000 Newtons—equivalent to a 100-pound weight slamming into your fingertips for a fraction of a second. Without structural support, joints buckle sideways and ligaments tear.
During the Great Lakes Regional Championship, I watched our starting middle take a spike directly on her ring finger. The PIP joint buckled sideways, and she was done for the tournament. Two weeks of proper taping might have distributed that force across both fingers instead of concentrating it on one vulnerable joint.
Taping for impact stabilization works by limiting range of motion during high-velocity contact. The tape doesn’t absorb the force—your muscles and bones still do that—but it prevents the extreme lateral deviation that causes ligament damage.
2. Grip and Friction Enhancement
Modern Molten and Mikasa balls have tighter microfiber panels, and in sweaty conditions, maintaining grip becomes a real problem. Taping the fingertips creates additional friction between skin and ball.
For setters, this is about touch—the ability to direct the ball precisely to your hitters through a clean set. For servers, it’s about generating consistent spin without the ball slipping at the critical moment of contact.
3. Injury Management: Playing Through Pain
Coach Ryan Insight
“I played through the Regional Championship with a jammed ring finger, buddy-taped to my middle finger with half-inch zinc oxide tape. Was it comfortable? No. Did it let me finish the tournament without making the injury worse? Yes. The key is the 1/4-inch gap between fingers—it allows natural joint movement and prevents the tape from snapping under tension.”
Buddy taping distributes load across two fingers instead of one. This isn’t about ignoring injuries—it’s about managing them intelligently when you need to compete.
4. Skin Protection: The Dry Gym Problem
Cold gyms, dry air, constant ball contact—your fingertip skin takes a beating. “Splits” are small cracks in the skin that form from repetitive friction, and once they start, they’re brutal to heal while continuing to play.
Tape creates a protective barrier that holds moisture in and prevents the friction that causes splits. Outside hitters, who generate heavy topspin on serves and attacks, are particularly susceptible to fingertip splits from repetitive abrasion.
5. Nail Protection
Blockers and hitters constantly risk nail trauma. A ball striking the fingertip at the wrong angle can bend the nail backward, cause bleeding under the nail, or rip it away entirely. Taping over the fingertip and wrapping around to the nail bed creates protective armor.
6. Confidence and Pre-Game Ritual
This one’s psychological, but it’s real. Taping becomes part of your preparation routine—a signal to your brain that you’re ready to compete. When I feel the tape on my fingers, I know I’ve done my preparation.
Taping Techniques: The Technical Breakdown
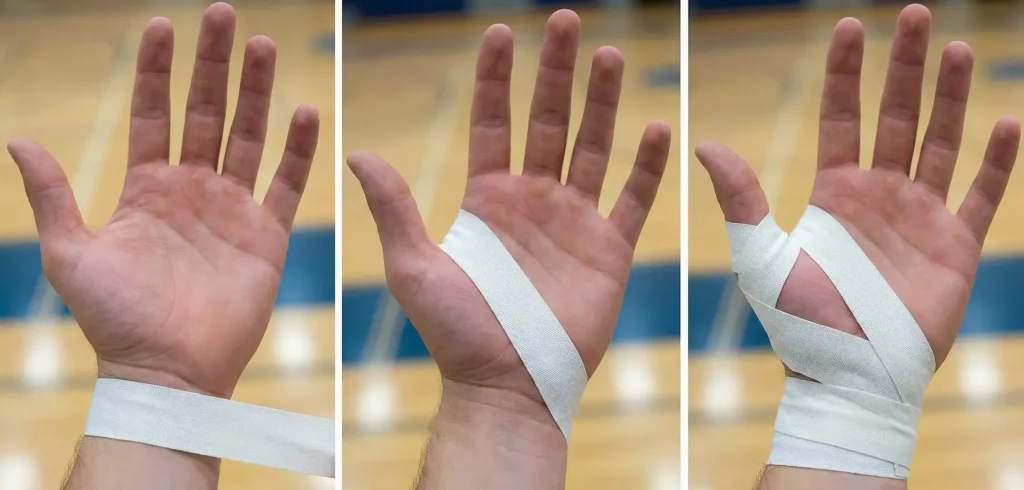
The PIP Joint X-Wrap: For Blockers and Heavy Hitters
The “Splint” Rule (2025-2028)
Under current FIVB and USAV regulations, tape cannot act as a rigid splint or “hard surface.” Your taping must allow natural joint flexion. If your hand becomes a “club” due to too much tape, a referee can whistle you for an equipment violation before the first serve.
This technique limits PIP joint extension while allowing normal flexion—perfect for absorbing block impacts.

What you need: 1/2-inch zinc oxide tape (white athletic tape)
| Step | Action | Why It Matters |
|---|---|---|
| 1 | Anchor strip above PIP joint | Creates stable base without restricting blood flow |
| 2 | Diagonal tape across middle knuckle | First half of the X pattern |
| 3 | Wrap around palm side, up opposite side | Creates opposing support angle |
| 4 | Cross PIP joint from opposite direction | Completes the X—blocks hyperextension |
| 5 | Closing anchor below PIP joint | Secures the wrap without circular tourniquet |
| 6 | Repeat X pattern for second layer | Reinforces structural support |
The finished wrap should show a clear X of tape directly over the PIP joint. This blocks hyperextension while allowing your finger to bend normally for ball contact.
Buddy Taping: For Jammed or Sprained Fingers
This technique binds an injured finger to an adjacent healthy finger, using the healthy finger as a splint.

What you need: 1/2-inch zinc oxide tape, gauze or foam padding
Critical: Place folded gauze between fingers. Wrap above and below the PIP joint—never over it. Leave a 1/4-inch gap between tape zones to allow flexion.
Note: Buddy taping works best for fingers 2, 3, and 4 (index, middle, ring). The pinky has a significant length difference from the ring finger, making buddy taping less effective.
The Fingertip Butterfly: For Setters
This technique protects the DIP joint and fingertip while preserving the touch sensitivity setters need for clean sets.
What you need: Kinesiology tape (pre-cut or from a roll)
Cut a 3-inch strip of kinesio tape. Round the corners to prevent peeling. With your finger slightly flexed (natural curve), anchor the middle of the tape strip directly over the DIP joint with zero stretch. Wrap one tail around toward the nail, applying 25% stretch. Repeat with the other tail in the opposite direction. Rub vigorously to activate the adhesive through friction heat.
For mallet finger prevention, apply tape from the palm side to the top of the finger with 50%+ tension to actively limit unwanted DIP flexion.
The V-Anchor Thumb Wrap: The Forgotten Protection
Coach Ryan Insight
“I’ve seen middle blockers lose an entire season to a ‘skied’ thumb. Don’t just wrap the fingers—if you’re at the net, use the V-Anchor thumb wrap. It’s the difference between a clean block and a trip to the ER.”
Why the V-Anchor?
Most finger injuries are dislocations, but thumb injuries are often tears (Ulnar Collateral Ligament) caused by the ball forcing the thumb away from the hand (abduction). The V-Anchor creates a “limit strap” that allows you to grip the ball but prevents the thumb from being ripped backward during a high-velocity block.
How to Apply the V-Anchor (Step-by-Step)
- The Wrist Anchor: Wrap one strip of 1-inch zinc oxide tape loosely around the wrist. This is your “foundation.”
- The First V-Strap: Start the tape on the back of the wrist anchor (thumb side). Run it across the palm, through the “web” between the thumb and index finger, and loop it snugly around the base of the thumb.
- The Return: Bring the tape back across the back of the hand to the wrist anchor, forming a V-shape.
- The Figure-8: Repeat the process, but this time, cross the tape over the previous layer to create a Figure-8 pattern. This locks the metacarpal joint in place.
- The Lock: Apply one final circular wrap around the wrist to secure the V-tails.
Pro-Tip: Keep your thumb in a “neutral” hitchhiker position while taping. If you tape it too close to the palm, you won’t be able to create a wide enough blocking platform.
Tape Types: The Right Tool for the Job
| Tape Type | Best For | Properties | When to Use |
|---|---|---|---|
| Zinc Oxide (White Athletic) | Structural support, blockers | Rigid, minimal stretch, strong adhesive | When you need to limit joint movement |
| Kinesiology (Elastic) | Skin protection, setters | Elastic (130-140% stretch), breathable | When you need protection without restriction |
| Micro-Thin Elastic | Setter touch preservation | Ultra-thin, high-tack, minimal thickness | When you need “tack without thickness” |
The Chemistry: Zinc oxide tape is for rigidity—blockers need their joints locked in place during impact. Kinesiology tape is for proprioception and skin protection—hitters and liberos need freedom of movement with a protective barrier.
Equipment Rules: What Officials Actually Check
Atomic Fact: The Legal Test
Can you still flex each taped joint? If the tape completely immobilizes a finger, it may be ruled as an illegal splint. Tape should support movement, not eliminate it. When in doubt, ask the first referee during pre-match inspection.
Under current FIVB 2025-2028 and USAV rules, tape is permitted but must follow the natural contour of the joint. Referees are trained to check whether tape creates a “hard surface” that could provide an unfair advantage.
At recreational and club level, these rules are rarely enforced strictly. But in USAV-sanctioned events or college competition, expect officials to check hand equipment during pre-match inspections.
Recovering from Finger Injuries
Immediate response (first 24-48 hours): Rest and assess severity. Apply ice wrapped in a towel for 15-20 minutes every 2-3 hours. Use over-the-counter anti-inflammatory medication for swelling.
Return-to-play protocol: Buddy tape the injured finger for practices and games. Perform gentle range-of-motion exercises several times daily. Strengthen with a rubber ball squeeze: 10 squeezes, 3 times daily. Start with light drills and gradually increase intensity over 1-2 weeks.
When to seek medical attention: Visible deformity, inability to move the finger, numbness or tingling, or severe swelling that doesn’t improve after 48 hours.
For DIP joint injuries (mallet finger), continuous splinting in full extension for 6-8 weeks is often required. Any flexion during healing can disrupt recovery.
Common Taping Mistakes
Taping too tight: If your fingertip turns white or you feel tingling, you’ve cut off circulation. Loosen immediately.
Taping the wrong joint: Blockers need PIP support; setters need DIP protection. Know your position’s demands.
Using rigid tape when you need elastic: Zinc oxide for protection kills your touch. Use kinesio for skin protection and grip enhancement.
Skipping the padding in buddy taping: Direct skin-to-skin contact causes friction burns. Always use gauze or foam between fingers.
Waiting until you’re injured: Taping is preventive maintenance, not emergency repair. Build it into your pre-game routine alongside your other warm-up preparation.
FAQs on Finger Taping in Volleyball
No. Taping reduces severity and provides structural support, but it can’t prevent all trauma. A ball striking at the wrong angle with enough force will cause injury regardless of tape. Proper technique, awareness, and conditioning all contribute to injury prevention.
Popular techniques like buddy taping, crisscross taping, and nail protection help in volleyball. Buddy taping supports injured fingers, crisscross taping stabilizes joints, and nail protection prevents breaks, improving performance by reducing injury risks.
Check your tape between sets. If it’s peeling, loose, or saturated with sweat, re-tape. Most players go through 2-3 tape applications during a five-set match.
No. Fractures require proper medical evaluation. Playing on a broken finger risks permanent damage and bones healing incorrectly. Get an X-ray and follow medical guidance.
Blockers tape for impact absorption—rigid zinc oxide tape on the PIP joint to prevent lateral deviation during high-force contact. Setters tape for touch preservation—elastic kinesio tape on the DIP joint to prevent skin splits while maintaining ball feel.
If you’re doing blocking or hitting drills at full intensity, tape. The impact forces in practice are the same as in games. Reserve tape-free time for touch drills and light technical work.
Remove the tape immediately. Increased pain may indicate the tape is too tight, positioned incorrectly, or that you have an underlying injury requiring medical attention.
Wrapping Up
Proper finger taping isn’t optional equipment for serious volleyball players—it’s fundamental maintenance that keeps you on the court. The key is matching your taping technique to your position’s demands: structural support for blockers, touch preservation for setters, protective barriers for everyone dealing with dry gym conditions.
Build taping into your pre-game routine. Know your tape types. Understand which joints need protection based on what you do on the court. And if something doesn’t feel right, adjust—tape that’s cutting off circulation or causing pain isn’t helping you.
Your fingers are your connection to the ball. Protect them intelligently, and they’ll keep you playing for years.
Keep spiking,
Ryan Walker